Saturday, 18 December 2010

popping and locking: a giveaway


Through a strange and very happy set of circumstances I have become the proud owner of an overlocker.


It is the other kind of sewing machine, the one with up to four threads and no bobbin. The devil's work - and a lot of fun.


A whole new avenue of sewing has opened before my very eyes.


Overlockers finish the edges of fabric, trimming as they go. This is especially handy when joining two pieces of fabric as it means you don't get raw edges.

Functionality aside, I really like the overlock stitch and think I will use it decoratively too. In fact, I think I may use this every single day from now on as I love it so much.


To see what it could do I made a few bookmarks. I selected fabric from my stash that had some kind of a narrative:

The Owl and the Pussycat by Heather Ross for Kokka.
Unknown Japanese Hansel and Gretel cotton
I noticed that the prints were all very whimsical and children's literature inspired. Wouldn't an adult fiction line be interesting? A deep red Margaret Atwood 100% bamboo sustainable jersey perhaps.

kokka fat quarter from raystitch
I cut two pieces of fabric about 8x21cm and one piece of fusible interlining about 7x20cm. I sandwiched them together with the interlining in the middle and then pressed. I overlocked all the way round and then attached some ribbon to the top on my old sewing machine with a tight zig zag:


These two below I did on my old sewing machine. The same cutting but I arranged them interlining first, backing piece next (right side up), then top piece on the top (right side down):


I found pressing the top edges over first very helpful. I then stitched quite close to the edge leaving the top open, then clipped the corners near to the stitching, and turned out (with the help of a blunt pencil to get right into the corners). I then slipped a piece of ribbon into the open top slit, then topstitched all round:

Little Red Riding hood also by kokka

I made quite a pile of these so they are now the first ever A Year Above the Shop giveaway! If you would like one then just leave a comment below. The first three will get a bookmark.


Happy bookmarking!


Thank you very much to the winners. I have a few more so if you would still like a bookmark then leave a comment and I'll pick a few at random.

Many many thanks to all, I will be contacting the winners and getting the bookmarks out as soon as I can.

Monday, 13 December 2010

Bi-festival decorations

I am very happy to say that my blog has been featured in one of my favourite design and craft blogs. On the main page of Bloesem today you can see this very post. Thanks Irene!


Here in our own little melting pot the festivities are underway. Like so many Londoners we celebrate two festivals: Hanukkah from my side of the family, Christmas from Mr Year's. Two excuses for lights, presents, feasts and fried stuff. And of course handmade goodness.


The beautiful scene above the shop last week as Hanukkah ended...


...and today as I got the tree (still alive, just a bit bald) out from the garden:


The crochet snowflakes and mushrooms are very quick and very easy. The cotton reels are old wooden ones that I have saved. The owl is from Caravan in Shoreditch, east London and the things on our mantlepiece are treasures (painting by  my grandad, Miss Piggy car from my 70s childhood, ceramic cube clock from Brussels flea market, vase and coffee pots from here and there, the Sherlock Holmes face complete with moving quizzical eyebrow I made in woodwork aged 11. Oh yes) made and found.

If you feel so inspired to make your own - and you really don't need to be an expert crocheter - please find tutorials for the snowflakes and mushrooms below. Do let me know how you get on.


Crochet mushroom pattern
You will need:
Red wool (can be any kind really, even acrylic is fine)
White wool
Knitter's sewing needle
Any size crochet hook
Old tights or clothes to cut up for stuffing

This pattern is worked in the round. The size of your mushroom will come out depending on the size of your hook ie. large hooks make a big fungi, small make a small. You might find it helpful to add a little marker at the beginning of each row to keep track of where you are.

row 1  (white yarn) chain 6 stitches and slip stitch to the first stitch to make a circle.
row 2  chain 1, double crochet (dc, US triple crochet) 1 into each stitch: 6 dc
row 3  ch 1, 6 dc
row 4  ch 1, 6 dc
row 5  (add red yarn) ch 1, 6 dc
row 6  2 dc into each dc: 12 dc
row 7  alternate your increase as you make 1 dc then 2 dc into each dc so you end up with 18 dc
row 8  dc 2 tog, then 1 dc into next, so you decrease back down to 12 dc
row 9  dc 2 tog all round: 6dc
row 10 6 dc

Then, using a little running stitch, or better still a french knot, do three white spots. Point your needle up through the mushroom to the tip to make a hanging loop. Tie a little knot in the base of the loop to secure it. Sew the end of the white thread through the mushroom to hide it. If you are making bigger mushrooms, pause around row 9 to stuff with fabric scraps.

I made a few of different sizes, sometimes I changed the increase and decrease a little, giving me different shaped mushrooms as shown above. As with most crochet these got quite addictive so I had to stop as it was getting a little out of hand.


Crochet snowflake pattern
You will need:
Any kind of white wool, acrylic or cotton. Mohair would be especially nice.
A medium sized crochet hook (UK 4-7 mm)

You can make these as long or as short as you want. They are a sort of bobble stitch joined by roughly 30 chain stitches. You just keep bobbling then chaining until you can do no more. It is nice to keep the tension loose so don't worry too much if you only have a big hook.

Make a bobble circle like this:
Chain 5 then slip stitch to first chain to form  foundation circle.
Chain 3, yarn over, insert hook through foundation circle, yarn over, hook back through stitch (3 loops on hook), yarn over and pull through 2 loops (2 loops left on hook).
Then yarn over and insert hook through same stitch again, yarn over, hook back through stitch (4 loops on hook), yarn over and pull through 2 loops (3 loops left on hook), yarn over and pull through all 3 loops.

When you have finished the bobble circle, slip stitch to the first stitch to secure the circle then ch 30. Begin the next bobble with the final 5 ch of the 30 chain making the new foundation chain.

If all that leaves you stumped there is a video here:

and a very clear pictorial explanation here:
the bobble circles are the used as the centre of her granny squares.


Friday, 10 December 2010

a social experiment bag

A collection was growing:

one of these cars is doin' its own thing
Meanwhile, I found this piece of material in a car boot sale in North Wales this summer. I loved the bright colours, the Richard Scarry-esque hive of activity and the nostalgic Americana Ed Ruscha-kind of vibe about it. If such a vibe exists. Which I doubt. But what to do with it?


Well, perhaps it was time to give the collection a home. And, along the way to think about some of the nature vs nurture questions that being a mother to two young daughters (what do you mean you don't want to wear trousers anymore??) makes me ask myself.

Will there be no toy cars in my life? I read an interesting interview with the theatre director Katie Mitchell on this subject, she calls it 'the pink age' and that it is to be celebrated.


Back to the racetrack. I thought it needed backing, ballast for it to lie flat enough to be a proper playmat. So I found some black needlecord and sewed it to the back. Then, I bound the edges with bias binding. To keep back and front together I also added a few tiny hand stitches so as not to disturb the lovely print.


I wanted it to be portable, and so made a little bag. Just what this house needs, more bags. I got these little teddies from a neighbour's yard sale. He also sold me the gingham which had a lovely tea-towel cotton grade of strength and thickness.


Cars go in the pocket, track in the bag and we are ready to play.


I cannot honestly say this had as warm a reception as the time I made my daughter a doll. There was also a funny moment that I did not manage to capture on camera where she wrapped it around herself like a dress. But, we shall see. I am learning that toys find favour at all sorts of unexpected times. So I live in hope. A hope tinged with realism.


Monday, 6 December 2010

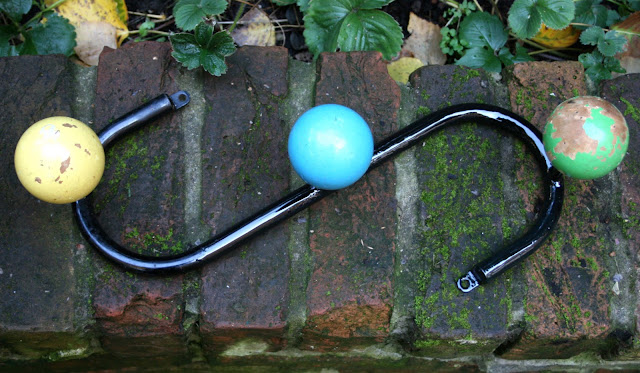
A restoration: coat rack


I found this in a junk shop. It looked at me, I looked at it: it was love, what can I say.


But it was in need of rescue. I thought about paint matching the colours for the balls but with gloss you have to buy a whole litre and I really hate disposing of unwanted paint. So I got as near as I could colour-wise with these enamel paints. I decided it was better to be a little bit off than to be wasting all that paint, hopefully the fish will thank me.


I sanded with coarse and then smooth sandpaper to get the paint off. I left the blue as it was not too bad and I loved the colour.


Several coats of enamel paint later I put a coat of clear gloss over the top.


The metal was touched up with black Hammerite.

It was all a bit noxious and it is very cold to be working outside at the moment but I think the result is worth it:


I really like the low-rent cheerful Eames kind of vibe about it. I can imagine Joan hanging her jacket on it at Sterling Cooper Draper Pryce. With a hanger, of course.


Wednesday, 1 December 2010

Smocking lessons


My aunt Sue got inspired by the post I wrote on my grandmother's handmade dresses. This is very exciting as she is someone who so often inspires me. She is the finder of all things needed and useful, the gatekeeper of an Aladdin's cave  by way of Forest Gate. Ladybird books, buttons, old cameras, haberdashery, toys and all manner of good good stuff. Everyone should have an Aunt Sue.

Once a week a little part of this cave gets taken to her stall on Broadway Market here in Hackney and we are so happy to make our visits to her a Saturday ritual. What will she have this week?


So it came as no surprise that she had some old magazines and books with instructions on how to smock, and that she knew the basics.


It was not as hard as it looks. It is case of making a few gathering stitches to form the pleat, and then sewing the pattern with decorative thread.


The upshot of it is that we have gone halves on a pleater. These do the gathering bit for you and make the whole process much faster. I am thinking about all the applications for smocking beyond dressmaking, which is definitely not my forte.


Watch this space (patiently).

Thursday, 25 November 2010

A crochet cushion


Some people are knitters. Me, I have crossed over to the other side and am firmly a crocheter. Mainly because it is quicker I have to say. I also love the way it seems to be easier to make very free sculptural items; you can change shape and gear so easily with only one hook. I do love it and try to have a crochet project on the go most of the time.


So good for hands like mine with a compulsive making disorder, I mean a perfectly healthy need to keep busy.


This latest offering took a few goes to get right. I was not following a pattern but knew I wanted a circle in a square for a seat pad. The first attempt was too gappy:


I worked out that each row I had to make sure that the 'clusters' of stitches were bigger than the gaps in between. And, that the circle grew enough for the fabric to stay flat and not accidentally decrease and pucker up.


I got the idea for using a jumper as the back piece from Attic24 again. I simplified it a little as sadly I could not persuade Mr Year Above the Shop to part with his red lambswool sweater and so found this cardigan in my local Oxfam shop.


It all worked out for the best as the buttons naturally provided the opening for the seat pad. Great.


I pinned it right sides together and ran a blanket stitch around the edges. I then turned it out and ran another blanket stitch, this time with thicker wool, to give it a bit of shape and a decorative edge:


It will live on one of our kitchen chairs, on the frontline of weaning and family mealtimes. Sorry cushion.


a year above the shop

a year above the shop