Showing posts with label DIY. Show all posts

Tuesday, 13 August 2013

ask a busy woman

The two girls went to stay with my parents for a night last week. And lo, the stars aligned and the baby slept for nearly three hours.

So I did this to a wall in the kitchen:

Before: grubby

After: none more black
I also got out the drill and did this:


These little handles had been sat staring at me for the best part of a year since I bought them in a flea market. They make me feel (marginally) better about the oversized filing cabinets that are our wardrobes.

Then, clearly on some kind of craft Stakhanovite high, I did a little sprucing up of some corners of my home. In our bedroom I put up a mobile for the baby and rearranged a mix of my old work, my Granddad's painting and a flea market buy:


I also added to this wall that I have previously featured here:


The print is from a collage by Martin O'Neill, the poster from the London Transport museum shop, the rest are handmade, heirlooms or charity shop booty.

And I thought, all the while, of the wise words of Caitlin Moran:

Give a new mother a sleeping child for an hour...and 'multi-tasking' does not come near to the quantum productivity of someone putting in an online grocery order, writing a report, cooking the tea, counselling a weeping friend on the phone, mending a broken hoover - all within the space of a 3 pm nap.  

-From How To Be A Woman, Caitlin Moran, Ebury Press 2011

Word.


Friday, 3 June 2011

Going back to my roots

There was a time, not so long ago, when hardly a day went by without a pair of these in my hands:


Tile nippers and adhesive: these were my friends.


Not so much on pots, mainly on walls. In and around London but also in Chandigarh and around the world, being a mosaic artist was my day job for a good few years, and a very nice one it was too.

I designed them, made them, taught others how to make them. I earned a living from this gig.

So when a friend broke her favourite plate when moving house, she came to me with the pieces, and a new commission was born. 


It was just like riding a bike. I remembered the dusty fun of this bit:


And the magic of this bit:


And the 'ta-da!' of this bit:


Irregular broken crockery calls for simple, so that is what I did. Making a jigsaw without a picture, finding backstamps and stories.


I thought a lot about this mosaic hero of mine. And this one.


Mmm... what next?


Friday, 8 April 2011

Thank you very much - a giveaway.


In the corners of the blogosphere I frequent, I had heard whispers about this wonderful book. I bought it with my birthday book token (thanks Mum and Dad) and love it already.


On the back it says: 'This is a book for low budgets and high ambition'. Well. Christine Schmidt suggests you use any old thing to print on, and that working from your kitchen table is just fine, and she gently holds your hand as she takes you through some fairly sophisticated techniques. I am a Christine fan.


I decided to try some stencilling first. With the DIY spirit in mind I used some offcuts of tablecloth plastic from this project to cut the stencil.


The results were pretty blobby and fuzzy. Whilst I completely agree with her about loving the imperfections (as with all things handmade), I found these efforts a little too hard to love. The plastic curled up and did not lie flat enough.


So I bought some acetate which was a little bit of a shame, but I'll use them over and over again as they really did the business. No curling, nice and stiff and flat.


I used Rosewood font and did two stencils, one for the letters and one for the shading. Think it turned out well. 


I learned:
  • Less is more (paint on the brush, that is)
  • Acrylic paints and no water at all worked best.
  • Using a stencil brush is not necessary.
  • It's all in the wrist.
  • Cats and stencilling do not mix.
One for Mother's Day too:


Next, I am going to try a lino cut and make some bespoke stationary. When I was a little girl that was my favourite birthday present to give. No self-respecting seventh birthday party was complete without a writing set. I'm starting the comeback.


With this in mind, I have three sets of three thank you cards to give away. Just leave a comment by next Thursday (April 14th) and I'll pick the names out from a hat. Thank you!


Thursday, 17 February 2011

The Year Will Grow

Recently, I was staring blankly at some pieces of wooden metre rule I had lying around from an old project.  

I was thinking about these rulers, about how lovely they are, and how they have managed to avoid extinction in the cut and thrust of the 21st century. 

I was also thinking about how little legs are getting longer, and how even smaller legs like to stand more and more these days. About how these children grow.

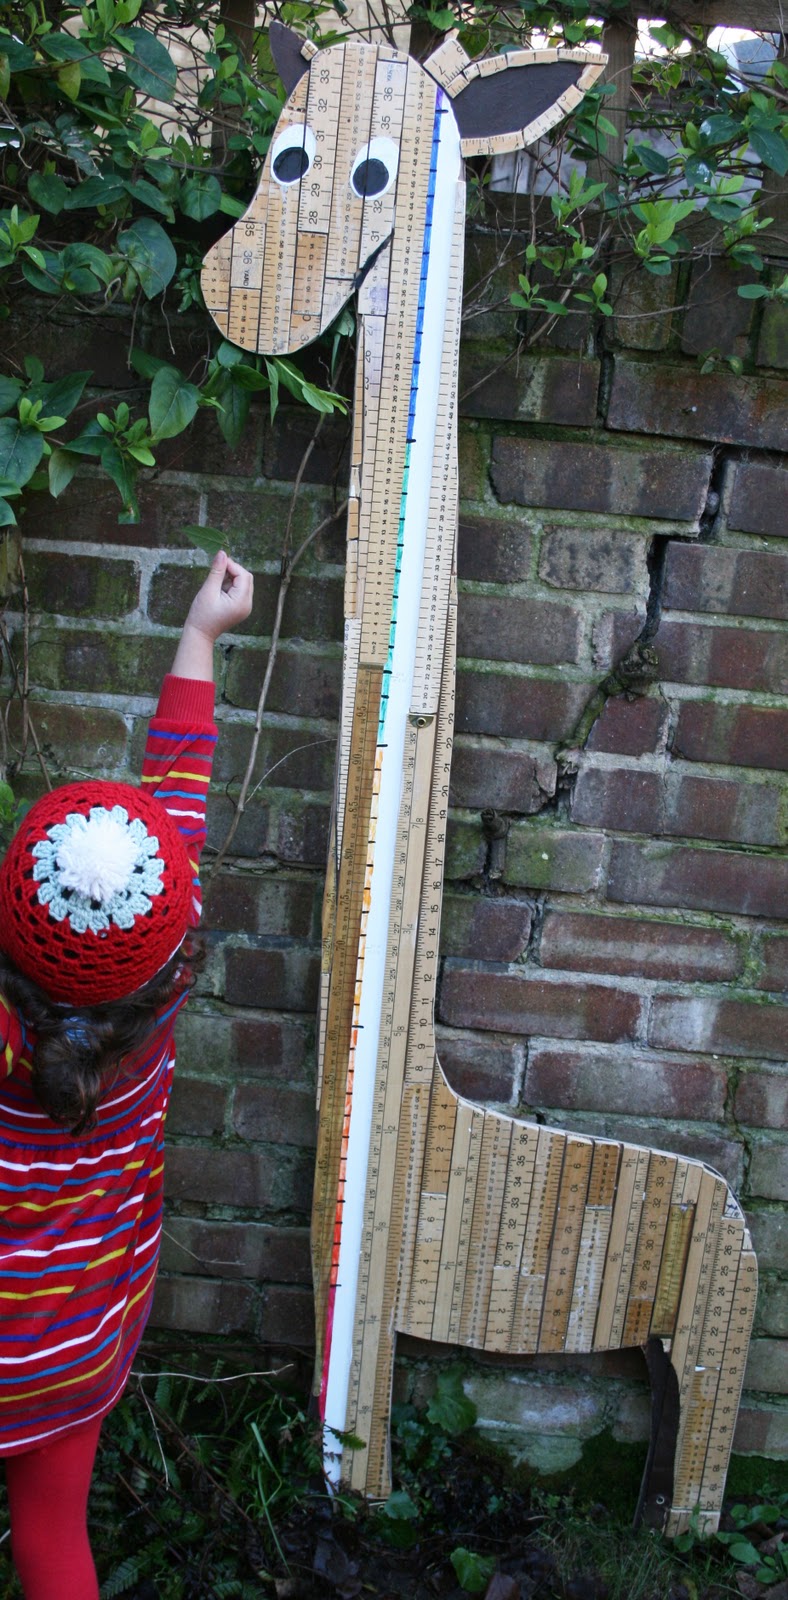
These thoughts converged in the blankness and a new project was born: a growth chart made with the bits of metre rule. And it must be a giraffe. 


So here is the lanky lass (a girl called Nelly apparently) who has been keeping me so busy:


First I had to find the right giraffe shape. Some of my very non-zoological models:


When I was happy with the shape I drew it out on some 6mm plywood. Then I stuck the metre rule pieces on top with a lot of PVA. I marked on the rules where they would be cut, or where they hung over the edges. I trimmed some of them with the saw.


Once that had dried I cut it all out with a jigsaw. This bit hurt (I have a rubbish jigsaw and no work bench) and I had some very kind help from Mr Year.


Next, I painted. I painted a white strip next to the metre rule that would be doing the actual measuring. I did in satinwood paint for ease of wiping and because that is what we had. I added eyes, ears and also an imperial line - feet and inches - next to the metric. Gotta be bilingual these days.


Finally, a lot of sanding. Each stage took a little while and there were a few splinters and muttered obscenities along the way but I am pleased with the result.


This song was my playlist - if a playlist can be one song only - throughout the making of this giraffe. Move along to 4 mins 27 secs for nearly three minutes of exquisite nostalgia and the sweetest song in the whole wide world. 

For the year will turn and the spring come round and the seed will grow.


Monday, 6 December 2010

A restoration: coat rack


I found this in a junk shop. It looked at me, I looked at it: it was love, what can I say.


But it was in need of rescue. I thought about paint matching the colours for the balls but with gloss you have to buy a whole litre and I really hate disposing of unwanted paint. So I got as near as I could colour-wise with these enamel paints. I decided it was better to be a little bit off than to be wasting all that paint, hopefully the fish will thank me.


I sanded with coarse and then smooth sandpaper to get the paint off. I left the blue as it was not too bad and I loved the colour.


Several coats of enamel paint later I put a coat of clear gloss over the top.


The metal was touched up with black Hammerite.

It was all a bit noxious and it is very cold to be working outside at the moment but I think the result is worth it:


I really like the low-rent cheerful Eames kind of vibe about it. I can imagine Joan hanging her jacket on it at Sterling Cooper Draper Pryce. With a hanger, of course.


Tuesday, 26 October 2010

A restoration

This mirror hung in my grandmother's hallway for many years. Not my grandmother who made the beautiful dresses, the other one. 


 Most of the things in her house were from the '60s as by then she had been in Britain long enough to be able to buy a house and furnish it. So everything was the mid-century look that is so desirable now. But, more about her and her elegant taste another time. As you can see, it needed some love and care. 


I sought advice from my old friend Brian at A&B Glass in Stoke Newington, London N16 (no website, they are Luddite and proud). I used to go there all the time when I made mosaics like this and this. He prised off the old mirror, cut around it and smoothed off the edges to make a nice new piece. He also advised me on how to do it.


The main body of the mirror was made of glass. Step one was to strip off the black sticky backing, a sort of fuzzy fablon. This mostly came off with ease and was seriously enjoyable.


I then painted the newly-stripped back with black gloss paint. Also fun as it was so shiny and smooth. I then fixed the new mirror to the front with mirror adhesive. And here it is:


No more checking my hair in parked car windows. 


Here it will hang, in my hallway now. 

a year above the shop

a year above the shop